Saturday, 22 November 2014

LIGHTSHIP CORMORANT / LADY DIXON - Chapter 71


Wasn’t it British Rail who used to say “We are getting there”. Well the lightship is making progress, but a combination of poor weather and ‘the day job’ does slow things down a bit. Poor old Simon seems to spend a great deal of time shifting building materials, bikes, plants and all sorts of ‘useful’ brick-a-brac around the deck – clearing each area in turn so that it can be worked on.  The bow used to look very rough (Photo 1);


 then it was cleared and painted (Photo 2); 

my few days down there saw the framework built on the starboard side (Photo 3); 

and just the last week the weather-proofing went down (Photo 4) 


and now there is just the roofing felt and rubber tiles to be put down.
Meanwhile, on the historical research side, I am off down to London in a couple of weeks to trawl through the Trinity House records held at the London Metropolitan Archives.  In January I am going to Dublin to follow up on the excellent work done by David Ryan. Hopefully the New Year will see some more interesting blasts from the past!
David

Sunday, 16 November 2014

LIGHTSHIP CORMORANT / LADY DIXON - Chapter 70


   What a difference a year makes – well a year and a half actually. The rear deck was then just tatty boards resting on the deck beams and not waterproof. 


Simon used a large tarpaulin for many months, but although this helped to keep out most of the rain, down below was still cold and damp, with heavy condensation dripping everywhere.


     Now, although by no means finished, it is weatherproof and well insulated. Large areas of dry ceiling are appearing below. The rubber tiles have yet to be laid to protect the roofing material.


     The story is the same along the starboard side, where the deck was in a bit of a mess and covered with odds and sods. The appearance was not improved by the rusty state of the superstructure.   


The deck is now weatherproof, insulated and clear of rubbish!  


   Meanwhile, David Ryan has unearthed one more photograph.  This one shows Cormorant on station at Lucifer Shoals (East of Rosslare Harbour). It must have been taken around 1900 before her foremast was removed and certainly before 1908 by which time her main mast had been changed to a fixed lantern.


David

Thursday, 13 November 2014

LIGHTSHIP CORMORANT / LADY DIXON - Chapter 69a


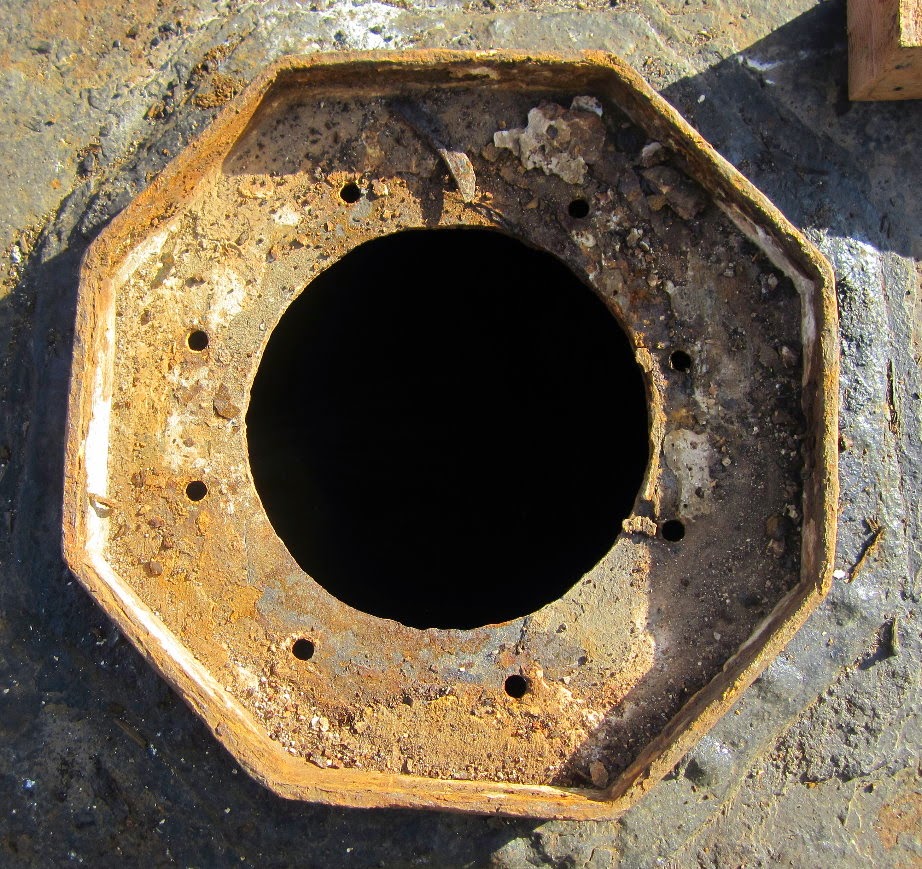
Just a short report on an historical discovery. During all the reports about the two and three mast photos, I did wonder where the foremast had been. On the foredeck, just in front of the companionway, was a wooden octagon with an 8-inch hole. 


 Too small for a mast and it fitted the 1943 blueprint position of an 8-inch dead-light, although the actual glass is missing. However, removal of the wood pieces revealed a rather larger hole 


  and an examination of the underside of the deck in this area showed a substantial structure, far too strong to support a small glass dead-light, but well able to take a mast. 


So my guess is that the mast hole was covered when the foremast was removed c1900 and the hole was opened up and used in 1943 to install a large dead-light.
David

Friday, 7 November 2014

LIGHTSHIP CORMORANT / LADY DIXON - Chapter 69


Although I have no intention of building a lightship, I have been reading the 1880 specification with much interest. I have been struck by the multitude of materials that have been specified in great detail for all the bits and pieces (scantlings?). The document starts off by insisting…..
 “All the materials used in the construction of the vessel to be of the best quality and description, it being in the power of the person or persons who may be appointed to superintend the construction of the vessel, to reject, and cause to be removed, any portion which may be considered inferior or defective”.
The word ‘best’ appears 16 more times and the word ‘good’ only twice.

Not counting any of the furniture, cupboards etc., I have counted nine different woods to be used. I will not attempt to catalogue all uses for all the woods.
Best East India Teak.  This is all over the ship, top to bottom and front to back ….. sorry, topside to keel and knighthead to stern post. The topmast, rudder trunk, outer and inner skins, topside and bottom planks, bulwark stanchions, hatchway coamings, sky-light and keel, to name but a few.  Only the mid-section of the keel was to be teak, the foremost and the aft lengths were to be ….
English or Irish Elm.  Parts of the keel, the whole of the false keel (3 inch thick sacrificial plank), and the bilge pieces.
Rock Elm.  Lower deck beams and sister keelson battens.
American Elm.  Chain lockers.
English Oak.   Roughtree rail (the main rail on the top of the bulwarks), rudder, bowsprit and tillers.
Dantzic Crown Deal.  Upper deck.
Red Pine.   Lower deck waterway and sky-light shutters.
Yellow Pine.  Lower deck.
Pitch Pine.  Mizzen and fore masts.

The metals specified were even more prolific and it was by no means a case of one suits all.
Staffordshire Iron.  Keel plate.
Cast Iron.  Hawse-pipes and bollards.
S.C.Stourbridge Iron.  The wrought iron fittings on the masts.
Best Quality Bessemer Steel.  Main mast.
Best Angle Iron.  Frames.
Galvanised Iron.  Water and oil tanks.
Gun Metal.  Knees (bracing pieces), rudder pedants and gangway stanchions.
Bulb Iron.  Deck beams, carlings (fore and aft deck supports) and clamp stringers.
Strong Lead.  Scuppers.
Muntz Metal,  Sheathing on the outside of the boat below the waterline.
Copper.  Throughout the ship!
Brass.  All door hinges and locks etc.

There was also concrete (to line the powder room) and cement (“The inside of the vessel, as high as the sister keelsons, to be coated with the best Portland cement”) and thick coatings of white lead between all ‘faying’ surfaces (joined surfaces).

David

PS: A close look at that 1908 photograph of Cormorant on station at the Kish, proves that it was indeed the Cormorant. The name is difficult to read there on the stern, but with the 67Mb hi-res scan there is no doubt that it does say ‘Cormorant’. However I cannot see names on the other photos as the vessels are more side-on and the stern is out of view. I wonder if all these lightships had their names permanently on their sterns and the name of their station in large letters on their flanks – changed when they went to a different station.

Monday, 3 November 2014

LIGHTSHIP CORMORANT / LADY DIXON - Evolution

A swift recap in pictures  from 'Cormorant', through 'Lady Dixon' and 'Lady December', to 'The Lightship' today. Yes it is the same ship throughout - all with the stern on the right.

Cormorant c1900


 Cormorant 1908

Lady Dixon 1957

Lady December 1991

The Lightship (alias The Beast)  2013

Saturday, 1 November 2014

LIGHTSHIP CORMORANT / LADY DIXON - Chapter 68


Re-decking the ship proved to be slower than imagined – and harder!  The computer-generated diagrams I put in earlier posts made everything look quite straightforward, but of course it wasn’t. The first task was to get a 100x100mm timber grid structure in place.
With the ship’s sides being curved and the decks sloping fore/aft and port/starboard, with odd projections here and there, everything had to be measured and placed carefully. We started on the stern and with the grid in place, proceeded to stage 2 – filling the spaces in the grid with 100mm foam panelling, each piece tailored to fit a specific space. (Photo) 


The foam is very easy to cut and any small gaps were filled with an expanding foam gun. The gun was a very good buy as it enables you to squirt the amount you want, when you want it, whereas the normal canisters cannot be left idle for long. That’s Chris the ‘roofer’ on the left and Simon on the right waiting for his chance to measure up the next panel.
   With the insulation complete and the plywood panels screwed firmly to the grid, Chris applied a layer of bitumen with a roller (Photo).   

This seals the ply and provides a key for the bitumen material layer which follows. (Photo)

    The bitumen layer has to be carried up onto the bulwark to ensure rain does not get underneath. As the bulwark was, in places, showing its age (136 years), the spray foam came into play again filling in some gaps before the layer went on.  After 5 days hard graft, I was showing all of my 76 years, but the foam wouldn’t work on me!
    All this took time and the final layer of gritted roofing felt had not been put down before I left. However, the starboard deck was also brought to the first layer stage and that might have been a much smaller area, but it was much more complicated, with light boxes and scuppers to cater for. (Photo)   The scuppers are important of course so they were left clear and dressed into the bitumen layer. 

    The light boxes can wait until next year (by which time we should have sorted out exactly how they are going to be made watertight and walkable on) and the ply, having been cut out, was replaced and the bitumen layer was uninterrupted. (Photo)   

That projection in the right foreground is a filling point, marked “Calor Gas” and below is a pipe going down into the bilges where I assume there is a gas tank.  Not knowing how well drained the tank is, we decided not to cut the filler valve down to deck level and Chris had to work round it!
David